Wednesday, June 22, 2011

Cosplay Tutorial: Lady au Pair

Illustration by Chandra Free

Yes, my Dragon*Con is going to be Venture-tastic, this year. Is anyone complaining? I didn’t think so.

Where the Dr Girlfriend costume draws on a 1960s, Jackie O. motif, Lady au Pair is more like a badass French nanny. This means lace and daisies, plus more purple than you shake a shrink ray at. The costume breaks down into three basic parts: lacy purple dress, matching hat with daisies, and white stockings and black boots.

Dress
Things you’ll need:
-3-4 yards of purple fabric. Something lightweight is probably best.
-3-4 yards of white lace.

I used Butterick pattern 6631, a Regency dress pattern that seems to be out of print, though you can still find it for sale. It worked out well, in the end, but, unless you’re good at improvisation, I’d recommend finding something else.

For the most part, I just followed the pattern as-is, using a light-weight purple fabric (that is actually identical to what I used for my Dr. Girlfriend costume). Obviously, the skirt needs to be cut shorter than the pattern calls for, and you should measure from just below your bus line to wherever you want the skirt to fall.

The two things that gave me some trouble were the sleeves and the back. The sleeves are gathered, which is inherently a pain in the ass, and the pattern requires that you also make lining for the sleeves because they are impossible to hem. Something you should know about me is that I never line anything unless I absolutely have to, mostly because I am lazy and don’t care, and there was no way I was making those sleeves twice. The good news is that the lace trim around the edges makes hemming the sleeves unnecessary.

The back of the dress was another story.

I stared at that pattern for hours, and I still don’t understand how the back is supposed to work. I wound up just folding in the skirt as needed and folding down the sides of bodice back so that it came to a V shape. Since it wasn’t meant to do that, I had to put in something to hold it up, so I used a piece of pearl chain, sewed into the dress on one in with a hook sewn in at the other. It looks a little funky, up close, but it’s fine at a distance. The whole thing actually looks kind of cool.


The other modification I made was to put an inset in the neckline, because it came down way too far. All you have to do for that is cut two triangles big enough to cover the area you want, stitch the hypotenuses together and fold to create a clean edge for the top, and sew it into the neckline. It’s super easy.

Finally, every edge of the dress gets edged with white lace. You would think this would be the easy part, but this is where I made the most screw-ups. To start with, I used off-white lace, because I thought it would look good with the purple, and realized later that it didn’t match my white stockings. This isn’t a big deal, but I felt really dumb. Then I didn’t buy enough lace... twice. If you’re attempting this costume, take heed: You will need much more lace than you think you do. When all was said and done, I think I wound up using somewhere shy of four yards. I also used a wider lace for the bottom hem for complicated reasons related to my dumbassery, but it looked okay.

I hand stitched the lace, which took about 8 hours, total. Specifically, it took something like 10 or so episodes of Fringe.


Hat
Things you’ll need:
-Medium brimmed straw hat.
-Purple spray paint.
-1/2 yard of black ribbon.
-Silk or plastic gerber daisies.

If you can’t figure this one out, you may be too stupid to costume.

I found an appropriately shaped straw hat for $3 at the Goodwill and spray-painted it purple. If you need to paint, you’ll probably want to get a matte paint, rather than a gloss, because straw hats aren’t supposed to be shiny. I was painting over a light blue and got it covered to my satisfaction in about three coats.

I was only able to find the daisies in a bouquet, not singly, but you’re going to be cutting them, anyway, so it doesn’t really matter. I cut two daisies as close to the flower as possible and cut a third with a 4-5 inch stem. I (carefully) hot-glued the ribbon around the crown of the hat, using straight pins to hold it in place. Once the glue was dry, I glued the two short daisies flat against the ribbon so that they overlapped. I glued the cut end of the long-stemmed daisy under the ribbon on the other side of the crown. I used straight pins to hold all three of the in place. Be sure to use enough glue, especially on the long-stemmed flower, since it’s more likely to come off.


Stockings and Boots
Things you’ll need:
-Cash.

Though it’s nearly impossible to find good reference pictures for Lady au Pair (or good Venture Bros. screencaps period) her boots seem to be standard black combat-style, which works as a fantastic counterpoint to the hyper-feminine look of the dress. You can get comfortable, relatively cheap combat boots online, but you'll have to shop around a bit. To save money, I went in a different direction and used a pair of heeled black ankle boots that I already had.

You can get white stockings just about anywhere that sells underwear or lingerie. I had a pair of lacy white thigh-highs left over from another costume, which work great, and I bought them at The Den of Evil Wal-Mart. You’ll probably want to invest in some kind of garment adhesive, like sock glue or adhesive strips, to help your stockings stay up. Come Dragon*Con, I’ll probably be borrowing Sabine’s body adhesive from Sock Dreams. This kind of stuff is a good investment for any cosplayer and is something you’ll want to carry with you at con.


Hair, Make-up, and Accessories

Hair is less of a concern for Lady au Pair than for Dr. Girlfriend, since it’s mostly covered by the hat, but a few little curls peeking out the bottom won’t be amiss. Make-up is almost identical, though I’m using a purple eyeshadow instead of blue. The only major accessory is a purse, the saga of which I will detail in a later post.

Some Lady au Pair cosplayers include Moppet dolls as part of the costume. I chose not to because, one, it’s a lot of extra work I don’t have time for, and, two, I hate the Moppets. If you want your own super-creepy tiny assassins, however, there are tips for making them out of regular baby dolls here. As far as I can tell, there’s no place to buy actual Moppet dolls or instructions on making them from scratch. If I ever become possessed by an evil demon and attempt such a project, I’ll let you know.


This costume wasn’t quite the feat of engineering that Dr. Girlfriend was, but it had it’s own challenges. In the end, I was really pleased with the results, and I think the dress is one that will work even in a non-cosplay context.


Production time: About one month.
Final Cost: Aprx. $15, not including sunk cost of boots and stockings.

-shadowen

Monday, June 20, 2011

Cosplay Tutorial: Dr Girlfriend


Before we go any further, be warned that this is not a costume for the faint of heart. It’s one of the most difficult things I’ve made to date and is, quite frankly, a feat of engineering. If you’re dead set on being Dr. Girlfriend but don’t think you’re up to the challenge, there’s a simpler take on the costume here (no tutorial), and there are a few for sale. I’m not linking to those because we here at Frenemy Cosplay don’t believe in buying pre-made costumes. If you didn’t bleed on it, you don’t deserve to wear it.


Are you scared, yet? Good. Let’s go.

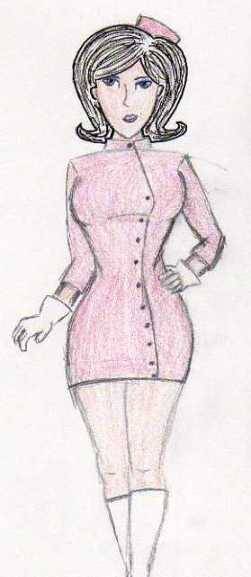
Whatever design you use, the look you’re going for is classic Jackie O. with a super villain twist. This breaks down to a few basic elements: pink dress, pillbox hat, and white gloves and boots.

Pink Dress
Things you’ll need:
- 3-4 yards of pink fabric. Stretchy is good, but not necessary
- One (1) 20” zipper
- buttons

I went for more or less screen accurate, with the dress. I’m not gonna lie, it was a pain in the ass, but I got decent results.

I used Simplicity pattern 5098, which I believe is now out of print, as a base. Patterns can be a pain to deal with, but, frankly, I can’t work without them. For the purposes of this tutorial, I’m assuming a basic understanding of how to use a pattern. If you don’t know how to use a sewing pattern.... Well, we might have to do a post for that.

This is not that post.

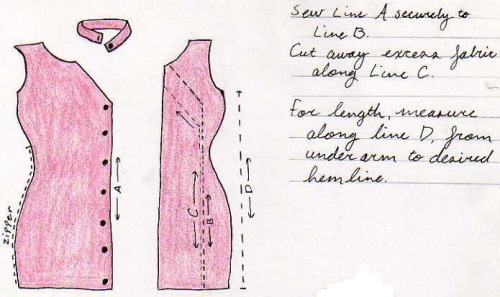
This pattern has a single, big piece for the shirt front, and it tells you to cut one. I cut two, one that follows the diagonal seam across the front and the other stops at what will be the center of the front of the dress. You can see the basic shape of these pieces in this diagram.


To turn the shirt pattern into pieces for a dress, measure the length from your underarm to wherever on your leg you want it to hit, allowing two to three inches for the hem (and the inevitable screw-ups). Be sure to mark your cutting line very carefully, so you don’t wind up with a dress that’s too long on one side.

The bigger of the two front panels will be your top panel. Fold over the diagonal and center (line A, in the diagram) edges and stitch them like you would a hem. Lay this panel flat over the other front panel, using the neckline to make sure they’re centered, and sew line A flat to the smaller panel. Leave the diagonal line open, because, trust me, you’re going to want an open neckline on this dress.

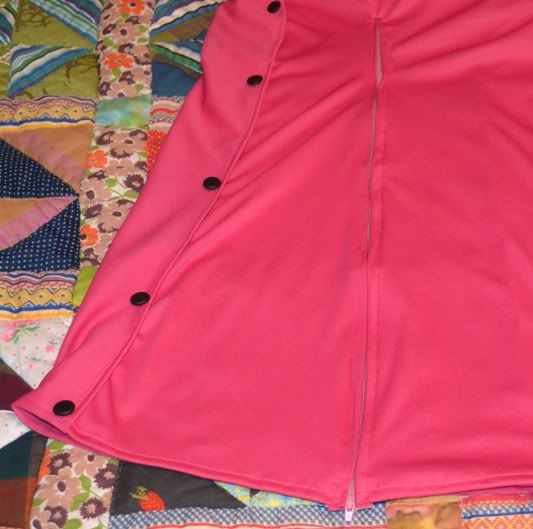
But, shadowen! I hear you say, Dr. Girlfriend’s dress has buttons up the front! Yes, my fellow Venturoos, yes it does. And do you know why the good doctor is able to wear a skin-tight dress with, presumably, working buttons up the length of it? Because she’s a cartoon. In real life, buttons gap, especially on tight or fitted clothes. If you are, in fact, a cartoon, you may disregard this tutorial and make a dress with working buttons. If not, let’s keep going.

Make the back of the dress as the pattern directs, except with the extra length, obviously. Once you have your back and front ready to go, attach the seams normally on one side. The zipper goes on the other side. Now, this was my first time putting in a zipper, and I’m not even going to tell you how I did it because I did it wrong. Regardless, I positioned the zipper so that it zips down the side of the dress toward the hem.
The fact is, unless you’re a tiny slip of a thing, you’re going to need some kind of fastener to get into this dress.


For this costume, I cut the pattern a size smaller than I normally wear (I’m a size 16 US; I cut it to a 14), and the dress looks like it’s been shrink-wrapped on. This works fine for the aesthetic, but it necessitates the use of a body shaper, so judge accordingly.

Once you’ve got this done, you’re 75% finished with the entire costume. No, really. That was the bulk of the work, right there. Don’t get too excited, though. There’s still plenty to do.

Cut the piece for the collar a little longer and wider than the pattern directs, but otherwise make the collar how it tells you. Same for the sleeves. Measure from your shoulder to past your elbow and cut your fabric pieces accordingly. Once again, mark your cut lines. You may live to regret it, if you don’t.

For the buttons, I used small, matte black pearl buttons, but you can use whatever you have available or think looks best. Measure increments down the top seam on line A and mark them with a fabric pen or straight pin. This is where your buttons will go, so you can do as few or as many as you choose. The button on the collar is a working button, which is a pain, but necessary. It should fall just left of center on your throat.

Finally, I cut away the excess fabric from the smaller front panel, which isn’t necessary, but gives a slightly cleaner look with the fabric I used. If you do this, be careful not to cut too close to the diagonal (see line C in the diagram), or you’ll wind up with a gaping hole. I learned this the hard way.

If you’ve made it this far, then congratulations! You’ve made the really difficult and really iconic part of your costume!

Now for all the other parts.

Pillbox Hat
Things you’ll need:
- an empty oatmeal can, or similar cardboard container
- 1 sq. foot-ish of excess fabric from the dress
- hot glue gun
- several large paper clips
- embroidery floss
- a needle with a large eye

This hat? Is something I will never make again. For serious.

That being said, it was cheap to make and didn’t take very long. I cut a can of oatmeal about two inches from the bottom to use as a base form. then I cut a circle of fabric about a centimeter wider than the base of the can. Both of these estimations turned out to be a little much, so I would recommend cutting the can about an inch or and inch and a half from the bottom and cutting the circle a little smaller. Cut a strip of fabric about an inch wider than the height of your cylinder and an inch longer than the circumfrence of the circle. Attach the strip of fabric to the circle of fabric so that it creates, more or less, a cylinder with an open seam.

At this point, you’ll want to see how your fabric fits around the base and adjust accordingly, as well as attaching the open edges of the strip. Once you’re moderately satisfied with the fit of the fabric, use a hot glue gun to fix the loose edges to the inside of the base. Since you want the fabric to fit pretty tight, you’ll need something to keep it in firmly in place while the glue dries. Large paper clips will work fine. Don’t worry about gluing down the entire edge, right now. Just fix enough points on the inside so that the fabric will stay in place.

I’d like to take this opportunity, if I may, to make some observations about hot glue guns. Specifically that there is evidence to suggest their secondary purpose may very well be to make smart people feel stupid. These things are fairly simple tools, but do not underestimate the danger they present, else you will find yourself with minor burns and feeling dumb as fuck.

Hot glue guns, friends. They’re no laughing matter.

Once the first round of glue has dried completely, go back with the glue gun and fix the remaining fabric to the inside of the can. Then set it aside and go do something else for a little while.

Is it dry, yet? Okay, good.

Now that the hat itself is made, your primary concern is getting it to stay on your head. You can try using an elastic band or attaching hair combs, but I stitched four small loops of embroidery floss on the inside edge so that I could affix the hat with bobby pins. At least, that was the plan. In the picture, the hat is held on with small hair clips, which is a temporary solution, at best.

What I ultimately did was gather up a small section of hair where I wanted the hat to go, coiled it up with bobby pins, and used a hat pin (read: very long needle) to secure the hat to my hair. It took some trial and error, and I won’t be doing any rigorous dancing in this costume, which would really be a very bad idea, anyway. Still, it holds well enough to make it through the day.

White Gloves and Boots
Things you’ll need:
- ...cash?

For the shoes, you have two options: buy boots or make boot tops. I chose to buy boots - mostly because I... have a thing for boots - but there are plenty of tutorials on making boot covers.
Boot covers with zippers
Non-stretchy and stretchy fabrics
Pull-over boot covers

If you choose to go this route, take a good look at the tutorials before you get started. Boot covers are deceptively simple and surprisingly difficult to make. It’s definitely the cheaper option, just know what you’re getting into.

If you choose to buy boots, the hardest part will be finding some that you’re willing to wear and that fit in your price range. As those of us with shoe obsessions know, good boots are hella expensive. If you want to go for screen accuracy -and can pull it off - look for white, stretch Go Go boots. Your best bet for these will probably be costume shops or online fetish clothing stores.


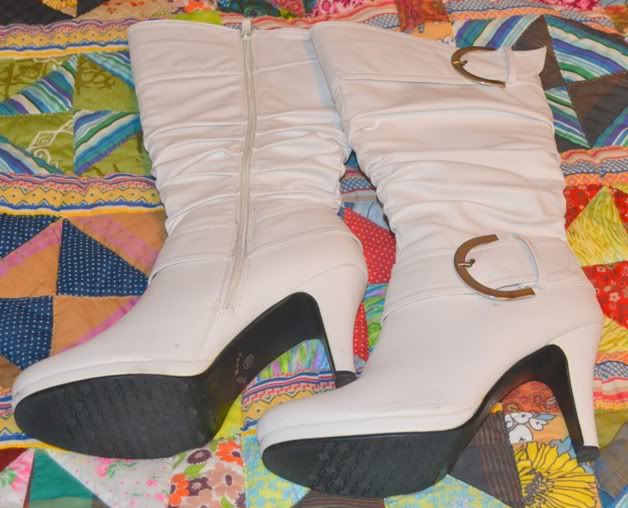
Even if you’re not going for screen accurate, white boots can be difficult to find in stores since, y’know, it’s not 1964. Being a lover of boots, short on cash, and having slightly chubby legs, I decided to fore-go the stretch boots for some that will look good on me and that I can wear when I’m not at con. I found these on Ebay for about $35, including shipping. Boutiques.com and ShoeOcean.com also have some good options.


The other thing to consider with the boots, and with all costume shoes, is the heel. If you’re buying boots, be sure to look at the height of the heel before you click “add to cart”. You don’t want to wind up mincing around on five-inch stilettos if you’re used to wearing sneakers everyday. I wear heels regularly, so the four-inch ones I got won’t be too much trouble, but I’ll definitely be putting a cushion in them before the con.

As for the gloves.... Don’t even try. Just buy the damn gloves. Seriously. You want wrist-length or three-quarter white gloves, and you can get them at Claire’s and places like that for not much money. Even if you hand-make the rest of this costume, buy the gloves.

If, however, you are crazy or a purist, there is a tutorial for making lycra gloves here.


Hair and Make-up
My hair is currently a short, black bob, anyway, so it’s more-or-less the right style. I just divided my hair into sections and used a curling iron to add some height and volume, curling the ends of the bottom layer out to give it that kick. I tried the look later with curlers, and it worked a little better. I’ll probably use hairspray or spray gell on the day of the con to help it keep the curl. If your hair is just nowhere near the right color or style, and you’re not willing to make drastic alterations, a wig might be the way to go. At some point in the future, we’ll be doing a post on choosing and wearing wigs, so keep an eye out.

As far as make-up, the important part is really the eyes. You want a classic cat eye shape with a blue eyeshadow. I used Maybelline’s “Blue Freeze” creme eyeshadow over e.l.f.’s lid primer and Palladio’s black Eye Ink pen for the liner. The lipstick is M-A-C’s “Pink Poodle” lip glass (obviously) over Rimmel’s “East End Snob” creme lip liner.


Other Accessories
The good doctor wears gold button earrings, which went out of style about the same time as pillbox hats. I got a pair of plastic button earrings for 99 cents at Goodwill, roughed them up with a metal nail file, and spray painted them gold. Sandpaper probably would have worked better, but I wasn’t about to go buy a pack of sandpaper for one tiny project. I just happened to have a can of gold spray paint left over from another project, like you do.

I’m planning to use the leftover fabric to make a purse, because, as Sabine pointed out, I need a place to put my shit. That’s going to be its own special production, though, and will get its own post.


Production time: About 2 months total, with breaks.
Final cost: aprx. $50, all included

Wednesday, June 8, 2011

Cosplay Forecast for Summer 2011

Picking out a costume for a con is a lot like choosing an outfit for a party. You find yourself asking a lot of the same questions: What will I look good in? What’s going to stand out? What can I afford? And the ever important: What’s everyone else wearing?

As the summer con season gets into full swing and all the much-hyped summer movies finally make it to our screens, this year’s cosplay trends are starting to emerge. Here’s my predictions for the costumes we can expect to see at up-coming cons.

Obviously, the best place to look for current cosplay inspirations is the “now playing” list at your local theatre, plus recent and soon-to-be-seen flicks. Before we dig in, here, I just want to say that I’m commenting on costumes, not on the quality of the films or even whether or not I liked them. Some of these films are a little divisive, and I don’t want to get into whether or not anyone should wear these costumes, just saying that people will be.

Sucker Punch
io9 already called it on this one, but it bears repeating. Between the sexy simplicity of the costumes and the hype surrounding the movie, I expect every other small-built woman at the con will be donning a sailor skirt and pigtails. The thing is, the popularity of this costume, plus the fact that the film came out in March, means that it’ll be pretty stale by the end of the summer season. What’ll be interesting will be seeing the Sucker Punch cosplayers who do characters other than Baby Doll or take on the costumes from the alternate realities. Can we get some steam-powered zombie soldiers, please?

Super
This movie was made for fast and dirty cosplay. There’s not much to work with as far as supporting characters, but we can expect to see dozens of Crimson Bolts and Bolties running around, with or without tire irons.

Priest
Between the movie’s poor reception and its underwhelming box office performance, we probably won’t see a whole lot of Priest cosplayers. Still, the film’s design was one of its strongest features, and these costumes are so simple and so cool, I’ll be disappointed if there aren’t a few, at least.

Cowboys and Aliens
I can’t make a lot of speculation on this, seeing as the movie’s not out yet, but, based on the nerd buzz and what we’ve seen of the film’s look, I expect to spot more cowboys than usual at this year’s cons.

X-Men: First Class
In addition to being about, y’know, mutants and stuff blowing up, this is very much a stylish, period film. There will certainly be some fantastic takes on the new (old?) X-suits, and Emma Frost’s wardrobe will give us a number of fresh spins on a classic, super sexy costume. Plus, if you got people with the right looks, the evil mutants in this film (It’s not clear whether they’re actually the Hellfire Club.) would make for a great group cosplay.

On the other hand, there are some big list films that we probably won’t be seeing much cosplay from. While the release of Thor might yield some high-quality replicas of the movie costumes, there will probably only be two or three really good ones, plusthe occasional classic Thor. Likewise, there’s always some Green Lanterns hanging out, and the movie might increase that number slightly but not by much. Ditto for Harry Potter and Captain America, though the film variation on Cap’s suit might yield some interesting copies. Finally, despite the release of a new Pirates of the Carribean film, Jack Sparrow is essentially done. He’s become as much of a con mainstay as any member of the Justice League, so let’s just cross this costume off the trendy list.

On the video game front, which I know about only via my Twitter and Tumblr feeds, Portal 2 and whatever the hell the new Pokemon game is out will probably have good showings, and Assassin’s Creed: Brotherhood will continue to be popular through the summer con season.

In general, though there will certainly be some undead stumbling around, there will probably be fewer zombies at the cons, this year. At SDCC last year, you couldn’t cough without breathing in zombie virus, but, by virtue of there being few major zed-word releases this year, the shambling masses will likely be fewer in number. With luck, though, there might be some decent Walking Dead cosplay, inspired by the AMC series.

As always, there will be dozens of Doctors and Companions of every era around and probably one or two Silence for them to run from.

Then again, I could be totally wrong, and every single con-goer will be in the ever classic Ash+chainsaw combo.

This has been your cosplay forecast for Summer 2011. Now get back to your sewing machines!

-shadowen

Wednesday, June 1, 2011

Screen Accuracy vs. Your Life

A phrase you’ll hear tossed around with insistence and irritation among cosplayers is “screen accurate”. People will ask if you’re going for “screen accurate” with a costume, or one might bitch to another about getting “screen accurate” hair. Screen accuracy is just a way to talk about how much your costume and acoutrements look like the character’s as they appear on the screen (or page), and an important step in putting together your costume is deciding where you stand on the accuracy issue.

Some cosplayers are sticklers for accuracy, focusing on details and perfect replication. Other cosplayers, not so much. To help you decide which direction to lean, we’re going to talk about wearability, travel, recognition, and skill level and how these concerns can be impacted by accuracy. For each concern, we’ve presented a point-counterpoint argument, with the lovely Sabine arguing in favor of screen accuracy and Shadowen arguing against.

This debate can get rough, so gird your loins, fellow cosplayers. Unless, of course, your costume calls for nudity.


Wearability
Shadowen: When putting together your costume, the fact should be foremost in your mind that you’re going to be wearing it all damn day. As we’ve discussed, what you plan to do at the con should factor into choosing a costume, and it should also factor into making the costume itself. Sometimes, that means sacrificing accuracy for the sake of wearability. I’m of the opinion that comfort and function are more important than strict screen accuracy.
Sabine: Wearability is essential for a costume that's going to con with you. However, wearability and screen accuracy don't have to be mutually exclusive; off the top of my head, here are some costumes that are comfortable and easily replicable: Han Solo, Indiana Jones, the Firefly crew, Dethklok, etc, etc.

Travel
Sabine: As previously mentioned, a screen accurate costume doesn't necessarily have to be hard to pack or travel with. Another question with travel: do you really want to travel with your costume? Being able to tote a costume around is great, but part of making a really screen accurate costume is having a showpiece. Do you need to carry it to con, or are you content with posting your pictures online or basking in the glow of the approval of your costumer friends?
Shadowen: Say you want to do this fantastic showpiece. You have a plan. It’ll be seven feet glorious feet of papier mache and will look exactly like it does on the show. You’ve got the skill, the money, the time, and the motivation. In theory, this is a great idea. If you’re driving to the con in a sedan with three other people, not so much. Likewise, if you have to take an especially delicate costume piece on an airplane. Adjusting your costuming with travel limitations in mind might make the end result less accurate, but it can also save you a lot of grief.


Recognition
Shadowen: I’ve said it before, and I’ll say it again: Every costume has some aspect that makes it iconic and recognizable, whether it’s a particular jacket, a certain tattoo, or an especially fierce hat. As long as you hit those high points, you’ve got room to maneuver on everything else. Like these guys. You don’t need to get all the details right, just the right details.
Sabine: Even for those costumes, the process of creating that iconic element exactly as it appears in the source material can be incredibly rewarding. But why stop there? Let's take Rimmer from Red Dwarf, as an example. Anybody can be a hologram with a silver H on their head, but how much more awesome is it to make the full uniform (or a lovely gingham dress)?

Skill level
Sabine: An accurate costume is really a chance to show off your skills. There's an incredible amount of joy in getting that one piece exactly like it's supposed to look. From armor to intricate beading, a screen accurate costume can show exactly what you're made of. However, a costume doesn't have to be hard or even entirely handmade to be screen accurate.
Shadowen: If you’ve got mad style skills, taking on the challenge of exact accuracy can be a thrill beyond measure. On the other hand, if you’re going to your first con and just learning to work your sewing machine, going for perfect screen accuracy might leave you with little more than bent needles and a broken spirit. That’s not to say that you shouldn’t challenge yourself or that you can’t have an accurate costume with minimal skills, but know what you’re able and willing to do. Say you’re hell bent, for instance, on cosplaying Padme Amidala - Let’s be honest, here, we’ve all fantasized about those costumes - but you’ve never made anything more complex than a flounced skirt and you have no idea how to make your hair defy gravity. Try going for a simpler version of one of those mind blowing dresses or the skin-tight white number from Attack of the Clones.


As always, it comes down to priorities. If what you want is a perfect, accurate costume, make it happen and find a way to manage the difficulties. If you’re looking for a more relaxed con experience, you might have to sacrifice a little on your costuming. Either way or anywhere in between, we wish you luck and remind you that this shit is supposed to be fun.

Wednesday, May 18, 2011

Concept to Costume: Steampunk

Hello! It is I, Sabine, and today I'll be showing you what I've been working on recently, my first from-scratch steampunk costume.

Concept

For a good steampunk costume, you need to have a strong concept. In most cosplay, when you're replicating a character, you already have that element ready, but for steampunk, you have to grow your own. There are many, many different kinds of people you can emulate, and if you don't have a strong sense of what you're doing, all you'll end up with is a mishmash.

For this costume, I decided to go in a different direction than most steampunk. Most steampunk emulates the dress of the middle to upper classes, so I decided to make a working class girl. Here's the concept I started from:

Madeline Ozell started out as a mill working girl; to be more precise, she was a spinner. Spinners occupied a middle position in the social hierarchy of the mill: not as fancy as the weavers, but not as desperate as the dye workers. In <em>The Classic Slum</em>, which you really should have read yesterday, Robert Roberts describes the attire of the spinners in the late Victorian/Edwardian era:

"[B]ecause of the heat and slippery floors, women worked barefoot, dressed in little more than calico shifts. These garments, the respectable believed, induced in female spinners a certain kind of moral carelessness. [...] Clogs and shawls were, of course, standard wear for all."

Needless to say, when the airship captains started poaching girls from the mills to work in their engine rooms, Madeline jumped at the chance.

Madeline's found that working on the airship isn't all that different from spinning; she's somewhere in the middle, between the fancy ladies and the stokers. Still, she's moved far up in the world, and her clothing is beginning to show it. She's still wearing her old calico shift, but she's replaced her homespun shawl with a fancier one and her clogs with a good pair of boots. She keeps the tools of her trade around her waist and her goggles and gloves securely fastened- for safety, you know. She's coarse but proud, with a tendency to mouth off a little, especially when she's embarrassed.

The Costume

The costume basically breaks down like this:
-shawl
-calico shift
-gloves
-goggles
-toolbelt
--purse
--drill and holster
-boots

The shawl I won't be discussing, because it was store-bought. It's not entirely accurate, but it's good enough for steampunk. The toolbelt I'll be detailing in a separate entry, because man this post got long fast, because this costume has a whole lot of pieces.

Shift

The pattern I used was Simplicity 7215. Far as I can tell, it's no longer available, but 9769 is apparently the same thing with new packaging and added drawers. This pattern is for an 1860's chemise; the only real differences between these and the shifts that mill workers wore (which I have been trying forever to find a reference picture of) is in the neckline, detailing, and length of sleeves. I probably could have gotten closer, but I also wanted something that would be flattering to my body type and easily accessible.

I bought the pattern and calico when I started this concept, which was, pfft, years ago. The calico is a lovely muted blue and brown vine pattern- I really couldn't tell you what brand it was or if it's still made, but I quite like it.


The pattern is complicated but not that hard (unless you intend to flat-fell all the seams like it tells you to, in which case you're a braver woman than I), so I only have a few notes on it. First of all, one of the reasons I chose this pattern was because of the sizing. I am, it must be noted, a large lady, and the pattern actually stops several dress sizes below where I needed it (I swear it fit when I bought it, but then I went to grad school...). However, whenever you're trying to size up a pattern (and we'll be doing a full post on this later), consider where exactly the size matters. For this particular pattern, the only real differences between the sizes were in the length of the sleeve band and collar. The collar was no issue, because it sits well down on the shoulder, so the only adjustment I made was increasing the length of the sleeve band.

Ignore my superhero pajamas.

The sleeves on this thing are a feat of engineering, but the dress proper took no time at all. All told, I finished in it maybe 4 hours (it would be considerably longer if you put in flat-felled seams, but I cheated). The other significant modification to this pattern I made was taking out all the lace edging (not character appropriate), which also cut my time a little.

All this, and I didn't get a picture of the shift on its own. Oh well. You'll see it at the end.

Pause to enthuse over buttons: Aren't these adorable? I saw them and had to have them, and they ended up going nicely on this dress.


Gloves

Way back in the day, when I was still in college, I made one of my best craft purchases ever. I was perusing the Walmart sewing section, and some damn fool had put a whole bolt of vinyl on the $1 table. So, I bought a whole bolt of vinyl for $8 and have been schlepping it from apartment to apartment ever since. Let this be a lesson- always check the sales and the remnants, because you'll never know what you'll find.

So, I happened to have plenty of material on hand with which to accessorize. First stop was a pair of gloves. Since the shift is very pretty and very feminine, I decided to go with a heavier, industrial look for the accessories- and what better to use than all this vinyl?

Now, I don't know about you, but I ain't 'bout fixin' to make no damn gloves. I am aware that I could probably do it, but y'all, I have better things to do. So, instead of gloves, I went with armwarmers. I took some arm measurements and just BSed it from there. They weren't staying on great, so I added a wrist band to make them more stable. Because this is steampunk, and in steampunk we wear clock parts, I added some wristwatch movements for detailing.


Shameless self promotion: If you're perplexed as to how I did this but want your own, I am selling these at my Etsy shop (http://www.etsy.com/shop/brokegradstudent). I also sell watch movements like the type used here, if you have a use for them.

Goggles

Every steampunk costume needs goggles; it's just a fact of nature. This one is no exception. I didn't make these particular goggles for this particular costume, but why not use what you have?

My goggles are built off of Hobart welding goggles (http://www.amazon.com/gp/product/B0017Z04SK). I like these because you can take them completely apart for painting and such, and they're made of nice thick plastic, not the flimsy stuff. Basically, all I did was take them apart, cover the eyecups with vinyl, paint the screw on bits (that's a technical term) with antique gold acrylic paint, and paint a little reticle onto one lens cover. Super simple and cheap. I still need to replace the elastic band with something more appropriate, but hey, if they've got airships, elastic is nothing, right?


Boots

There are many options when considering footwear for a steampunk costume. You can rock big clunky boots or delicate little highbuttons, but the thing that unites them all is that they are very expensive. Here at Frenemy Cosplay, we are broke, so my choice was boot tops.

Boot tops are not nearly as hard to make as people make them out to be, especially if you choose to make pull-on ones. For these, which pull on and then are attached with tied garters, all I did was take a measurement around the widest part of my leg and make a tube big enough to fit over it (keeping in mind that the vinyl stretches a bit). I machine stitched them together, flipped them inside out, and added appropriate buttons. It was really quite a simple process- do not fear the boot tops!

Please ignore the fact that I wore the wrong shoes for these pictures. I swear they look right over my boots.

And with that, the base of the costume was done!

Final Thoughts 

I tried to make this costume as cheaply as possible, being that I had blown my budget on my Doctor Orpheus costume (post forthcoming!) and that, when I made it, I intended to wear it to only one con. On that score, I was quite successful; not counting the sunk costs of the things I already owned, it came out to about $30 US (for comparison, Doctor Orpheus ran me over a hundred).

Next time, we'll talk about the funnest part of the costume, the toolbelt. See you then!

Monday, May 16, 2011

A Brief Salute to our Predecessors

Sabine will have a proper post for you, later in the week, but I'd like to take a moment to appreciate those cosplayers who've gone before us. To that end, we salute the guy who made a C-3PO costume in 1977.

In the post-digital age, we've inherited endless resources and a rich, inclusive culture of geekery. We should never forget the trials and tribulations of those who built that culture, those who first thought it might be fun to dress up like fictional characters.

Thank you, early cosplayers. Thank you.

-shadowen

Tuesday, April 5, 2011

11 Things You Need at Con

So, we've already covered make-up, but what else should you bring to the con? On top of your costumes, clothing, toiletries, etc., here are some critical pieces of equipment to have at hand when you're conning it up.

1. Food and water. This is crucial. If at all possible, get some food and take it with you. Get doggie bags. Even eating out of the hotel snack machine may be cheaper than buying food on the floor at some cons. ::cough::SDCC::cough:: Even more important than food is water, especially if you're in a hot costume. Don't bring your best Nalgene; be advised that your water may be taken at the door at some events, particularly music festivals. If this happens, fork out the four bucks at concessions for a new bottle. Trust me, you'll thank me for it later. If you're not flying, you may also want to bring your own booze; as previously discussed, cons vary a lot on this, but you might bring your flask as well (check local liquor laws first).

2. Bobby pins. These things are amazing. They solve all kinds of hair emergencies (including just general bad hair when you're not in costume), and in a pinch they can be used to repair clothing, especially fallen hems.

3. A sewing kit. If possible, pack your own; don't rely on one of those little prefab kits. Cannibalize the package and the scissors, cause it's hard to find scissors that small. And for the love of god, put it in the bag you carry with you. A good sewing kit should include:
-dressmaker's pins
-bobbins of thread in appropriate colors to match your costume(s)
-small scissors
-needles appropriate to the materials of your costume(s) (if you're running around in a leather catsuit, little bitty needles are going to do you no damn good if you pop a seam)
-safety pins
-extra buttons/snaps/hooks and eyes, as appropriate

If you're not experienced with sewing, have bad eyes, or prick yourself a lot, you may want to add a needle threader and thimble.You may want to bring more than this if you're, for example, going to a con like Dragon*Con with its own sewing circle events, but this is the bare minimum that you need for common repairs.

4. A bag to carry with you. You HAVE to have something to put your cell phone and wallet in. Do NOT rely on someone else to carry your stuff, unless you're in a costume so elaborate that it requires a handler anyway. You WILL get separated, and without your cell phone, how will you find them?

"But Sabine!" I hear you say. "I am cosplaying a naked alien! How will I match a bag to my costume?" Well, make it out of nude-colored spandex. Make it out of fucking banana leaves if you have to. Get creative with that shit! If you're wearing something with a belt, make a little pouch. If you're wearing a corset, hide it amongst the boys (you know what I mean). If you're wearing socks, you can even buy little sock garters with pockets (see Sock Dreams).

5. Double-sided tape. There's no limit to the things you can do with this stuff. Signs, costume emergencies, keeping that one clumsy friend from wandering off.

6. A spare one of everything. If you have a costume piece and you have a spare of it, bring it. I don't advocate carrying around a whole extra copy of your costume in your bag to the panels, but it wouldn't hurt to have it in your suitcase. This is crucial if your costume contains small, easily lost components, like pins or buttons. And if you're anything like me, you'll probably forget the original and pack the spare.

6a: Spare shoes. No matter how hot your shoes are, if you're not wearing flats, you will eventually want to take them off. It's easy to kick them off during a panel, but if you're planning on walking around, there's nothing worse than walking or standing on tired, achy feet. Bring shoes that you can pack; flipflops are an option, but for a better look, collapsible ballet flats are also an option. Dr. Scholl's makes a nice pair of fold-up flats with their own carry-case, but you could just as easily pick up some Isotoners in a color befitting your costume (don't waste your time on cheap knock-offs).

7. Paper and markers. Hear me out on this one. The uses for paper should be self-evident- you might want to get autographs or take notes at a panel or pass out your contact information to people. The markers, however, are for making signs. There are a LOT of people at con. Like, really a lot of them. The best way to find your friends is to have a sign. This is another way to get creative- we've used location devices from fabric banners to life-sized cardboard cutouts of David Duchovny- but a good old fashioned sign will take you far. It's also great for last minute half-assed costumes- all you have to do to be an Inception cosplayer to hold up a sign with an arrow pointing to yourself that reads "Eames" (think about it).

8. First aid. At the bare minimum, you should include bandaids, Neosporin, painkillers, tissues, gauze, and an Ace bandage. Trust me, you'll need them, particularly if you're wearing heels. It's probably fine to have one first aid kit per group, but you may want to stick bandaids and tissues in your bag for the floor.

9. Baby wipes and hand sanitizer. You're going to be touching a lot of people and a lot of stuff a lot of people have touched, and you're not always going to have time to wait out the line for the bathroom. My preference for portable hand wash is Lifelogic No-Rinse Go! Soap, which is available at CVS or REI. It got me through a field season in Guatemala with ease, though if you like antibacterial gel, you can bring that too (just don't get it on your costume!).

10. Cash. Don't rely on your credit card to get you through the dealers' room. Most smaller vendors don't take credit cards, and having cash also helps you track your spending a little better than a credit card. If you're with a larger group, it's also essential for splitting bills at restaurants.

11. A good attitude. Cheesy, I know, but I'm serious. If you don't have your game face on, why even bother going? You also drag everybody else down if you really don't want to be there. Don't be that guy.

Bonus Round:

-Sock Glue. If you're doing anything involving low-cut or super revealing costumes, knee socks or thigh highs, roll-on body adhesive will save your life. Nothing is more annoying than having to constantly readjust your costume, and sometimes all the pins and tape in the world just won't work. It runs $10 on Sock Dreams, and it is worth every penny. If you wear long socks in general, it's a good thing to just have around for daily use too.

-Things you want autographed. Make sure these things are portable or learn to pack around them. Getting David Hewlett to autograph your SGA S1 DVDs is easy; getting James Robinson to autograph your Starman Omnibus editions is a little more difficult. Remember that you can also buy something on the fly, which may be more convenient.

-A collapsible bag. This depends on how much you want to bring back with you, but if you're flying and planning on buying more things than you can get into your suitcase, the best plan is to bring a packable bag. These are relatively inexpensive; I got mine at REI for maybe $15, but they should be available anywhere that sells luggage. Remember that at some cons, you can also mail packages home; check your options.

Got other tips? Feel free to share them in the comments!

-Sabine